Custom In-Ear Monitors Fitting Guide
Congratulations on ordering your new custom in-ear monitors! If this is your first set of IEMs, you’re in for a treat. Please read through the manufacturer’s care instructions to be protect the function and longevity of your investment. In this brief guide, we’ll outline the responsible use of them to improve your monitoring quality and promote safe listening habits. If you've worn IEMs before, I think you’ll find some information in this page useful.
First, consider the manufacturer warranty
When you first receive the IEMs, be sure to take a minute to follow this quick guide to check the earplugs for both comfort and sound quality. Warranty details vary by manufacturer, but they all carry a short-term warranty against defects. Don't delay! Try them on right away and if anything is amiss, please contact me immediately so we can get the problem resolved.
Fit Check #1: Comfort
Many people find it awkward to put the IEMs in for the first time. Here are some quick tips to get you setup for success without pulling your ear off:

Your RIGHT earplug is marked with a RED dot and the LEFT with a BLUE dot.
If you forget Red = Right, just think about a political map... no wait... don't do that.
Start by finding the left and right monitors. They are color coded or may even be labeled: the right is typically marked with red (logo, letter R, dot, etc) and the left with blue. Holding the ear peice with your thumb and forefinger, push the tip in your ear while twisting the top backwards (away from your nose). Gently pulling back on the top of your ear can make insertion easier.
Firmly press the ear piece into your ear to ensure it is all way in. They should block out significant amounts of outside sound. If they do not, or only block sound when you press on them, then try fitting them in your ears again.
Note: some ears will need a lubricant to get the earplugs in the first few times. Oto-Ease is the stuff made specifically for this purpose, but general-use water-based lubricant will work.
Tuck the cable up and over your ear, taking care to tighten the cable against the top and back of your ear.
Once in your ears, they should feel snug, but without any pinches, pokes, or pain - even after 30+ minutes of wear time.
Fit Check #2: Sound Quality
When plugging them into any sound source or media player, be careful to first turn down the volume all the way. As with anything in audio, start at 0 and slowly raise the output to avoid sudden bursts of signal. IEMs are highly sensitive earphones and can easily exceed safe listening levels without precaution.
When listening to signal, note any distortions or irregularities. There should be no crackling or intermittency with regular cable movement.
Check the seal of your devices by assessing the sub bass. Any break in acoustic seal will diminish your perceived bass output. Sensaphonics makes a handy free online seal test for this purpose.
If there are any issues with either the comfort or the sound quality, contact me! I can solve most issues over the phone or via email.
Hearing Care Instructions
First, care for your ears and hearing. In-ear monitors are NOT hearing protection devices. They are often marketed as such, and proper use can promote safe listening levels, but that is not inherently true. Just like a fast car is not inherently a safety device, but it can be driven safely.
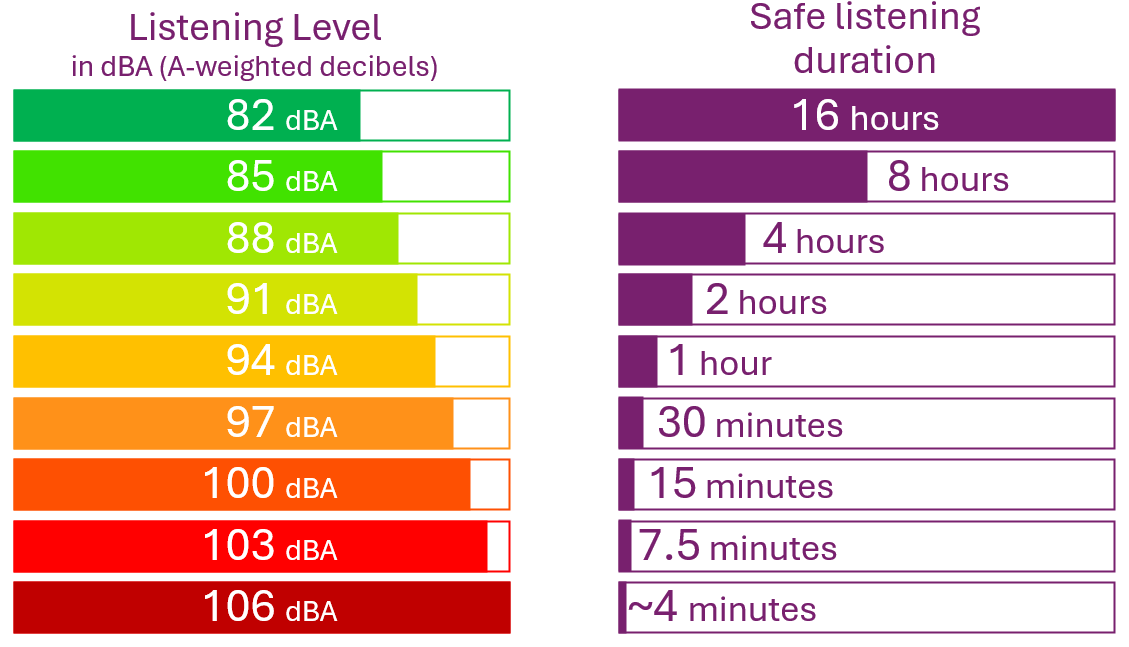
Based on the NIOSH Standard (1998)Recommended Exposure Level (REL) at 3dB exchange (doubling of risk) rate.
Listening at high output levels for extended periods of time will increase your risk of hearing loss and other hearing disorders such as tinnitus. The best guiding principal is to find the lowest volume setting that allows you to hear and perform. It is oh-so-tempting to turn up the sound to really feel it and enjoy the incredible sound quality if your devices, but try to control yourself. Doing so may shorten your healthy listening years and result in irreversible hearing loss.
To check the sound output and determine if your exposures are in the safe and reasonable range, there are a few methods:
1) Listen to your ears. If they are ringing or muffled after a session or performance, then take it as a sign that they were over-exposed.
2) Use the live stage levels as a rough guide. The monitoring level through the in-ear monitors should be noticeably quieter than the stage levels. Since most stages with drums and amplified instruments are 95 - 105 dB, levels which are safe for your ears for approximately 45 to 5 minutes (respectively), you can increase the safe listening time by lowering your exposure levels.
3) Use a dedicated measurement device such as the dBCheck Pro or Audix TM2. The former works in real-time to measure your exposure while wearing the IEMs, while the later is a measurement microphone for calibration, assessment, and determining exposure SPL while the devices are not on your ears.
Device Care Instructions
Second, care for your devices. Follow the manufacturer’s instructions (as all materials and makes are different), but generally speaking these are good tips:
Wipe off the canal portion of the ear pieces after every use. A dry paper towel or other lint-free tissue or cloth works well. Avoid alcohol or solvent cleaners.
Gently wrap the cables (the most breakable part of the IEMs) and store them in the hard case every time.
Check the sound bore(s) for wax or other debris periodically. Carefully remove wax according to the instructions, often with the supplied tool. Ear wax us public enemy #1 for IEMs.
Closing Thoughts
Remember, just like regular dental checks are recommended for anyone who relies on their teeth for munching, crunching, and smiling like a movie star, annual hearing testing is recommended for anyone who relies on their hearing for their livelihood and quality of life. Schedule your annual test here
I sincerely wish you many long and successful years of music making and/or listening with healthy ears to come!